How To Bypass Sky Broadband Shield in 2023
Are you looking for an easy way to access websites that have been blocked by your internet service provider? Do you want to be able to bypass Sky Broadband Shield and dodge its strict parental control settings? If so, this is the post for you!
In this post, we’ll discuss some simple methods and tips for getting around Sky’s strict firewall known as Broadband Shield. Whether it’s accessing a website that has been blocked by Sky or just taking back control of your browsing experience, we’ll show you how with our practical advice and detailed tutorials. Read on to find out more!
Here is a step-by-step guide on how to get around the block which looks like the image below:
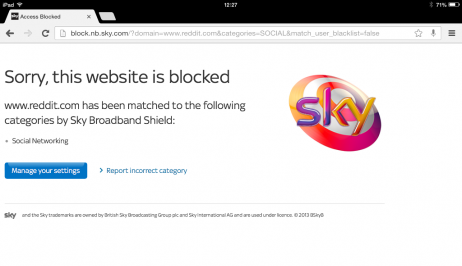
If the message says ‘Access Blocked’ with a mention of a court order, then you’ll want to read our Kodi Not Working on Sky Broadband article which discusses that topic in detail.
What Is Sky Broadband Shield?
Sky, the broadband internet provider have a network-wide content filter. In plain English, that means that if you’re using a Sky internet connection and the content filter is enabled, you will be blocked from accessing adult content.
This filter is disabled by default but can be set to various sensitivity levels. You may be blocked from watching porn, or if it’s on strict mode, you may not even be able to access many social media sites or forums.
How Does It Work?
When your computer (or other devices) tries to access a website, it uses a service called DNS to turn the web address (www.examplecom) into a numeric address, called an IP address.
Sky’s filter intercepts this request, so instead of giving your device the address of the server hosting the website, it sends it’s own address, sending your web browser to the dreaded block page.
How Can I Bypass Sky Broadband Shield on Windows 10?
The trick is to tell your computer to use a different DNS service than the one provided by Sky. That way, Sky isn’t able to send an incorrect address as it’s not involved in the transaction!
To do this, we’ll go into the settings on the computer and set some static DNS entries. In this article, we’ll use Google’s public DNS servers, which are fast and completely unrestricted (as far as I am aware).
1. Navigate to settings

Click on Start, then click on the cog, to go to your computer’s settings.
2. Select ‘Network & Internet’
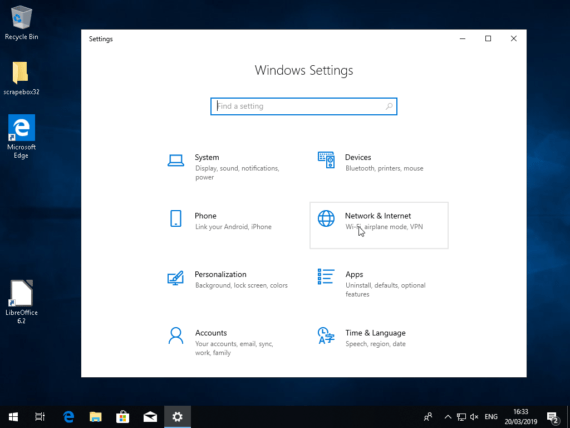
Click on the ‘Network & Internet’ section. If you can’t see it, you can search for ‘network’ and it should appear.
3. Select ‘Change adapter options’
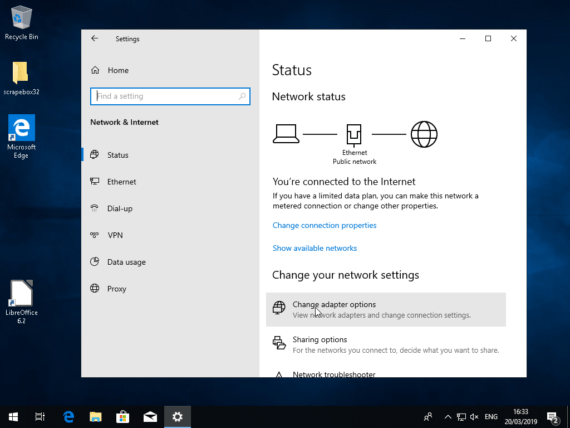
Click on the ‘Change adapter options’ from the page that appears.
4. Right-click on the relevant network connection and select ‘Properties’
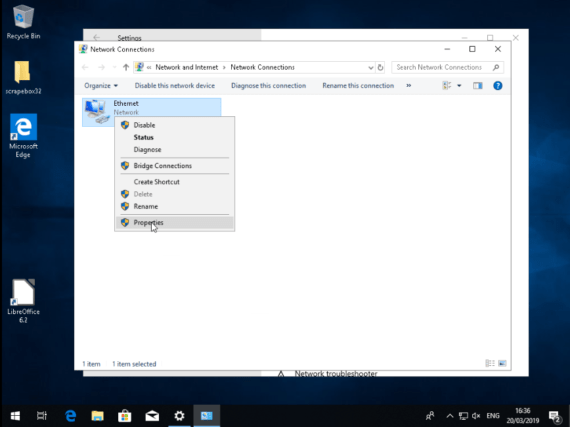
You may see a number of different connection here. The one pictured is my laptop’s Ethernet connection. If you have WiFi, your WiFi connection will have a green WiFi symbol on it. Right click on the relevant network and select ‘Properties’
5. Double-click on ‘Internet Protocol Version 4 (TCP/IPv4)’

If you can’t see ‘Internet Protocol Version 4 (TCP/IPv4)’ in the list, scroll down and it should be in there.
6. Enter new IP address into the ‘DNS server addresses’ section
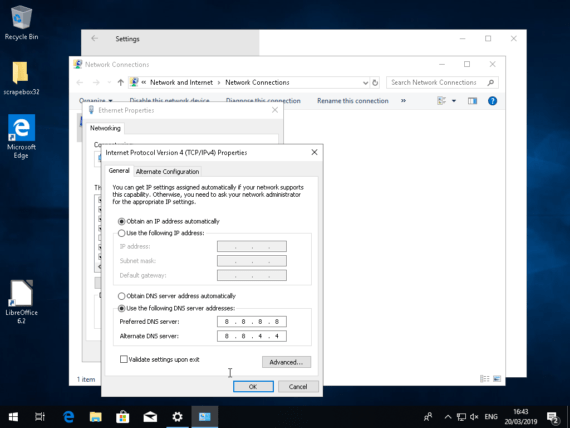
Select the ‘Use the following DNS server addresses’ option to enable the two DNS server boxes.
Then enter the following addresses, as in the screenshot above:
8.8.8.8

8.8.4.4
Click ‘Ok’ to save your changes on this window and any others that are open.
Open up a web browser window and navigate to a website that was previously blocked. You should now be able to navigate to any website, completely unrestricted!
If there are any problems, you can always repeat the process and on the last step just select ‘Obtain DNS server address automatically’. This reverts the change completely.
Other Methods
If for whatever reason you aren’t able to use the trick above, all is not lost. Here are some other suggestions.
Download and install TOR Browser
TOR (The Onion Router) Browser is a free web browser which is based on Firefox. It’s modified to automatically use public proxy servers in order to maintain your anonimity. It’s totally free and can be downloaded from here
Use a VPN
A Virtual Private Network (VPN) encrypts your web traffic to protect your privacy and prevent snooping by your ISP or other service providers. Another feature of any good VPN provider is that it provides in-build DNS services that are totally private.
VPNs normally cost a few pounds per month, but in my opinion, it is money well spent.
There is a wide range of VPN providers, but I recommend NordVPN. They are cheap, reliable and really easy to install and use. I use NordVPN regularly on a Sky Broadband connection and it works great every time.
Add the website addresses to your HOSTS file
If Windows finds an entry in your hosts file, it will use this to translate the website address into an IP address. This bypasses DNS entirely.
The first step is to get the IP address of the website. Just search Google for ‘website IP checker’ or use one of these I found:
- http://www.ipvoid.com/find-website-ip/
- https://ipinfo.info/html/ip_checker.php
- https://www.site24x7.com/find-ip-address-of-web-site.html
Enter the domain name into the tool and it will provide you with it’s corresponding IP address.
Now you’ll need to open your HOSTS file (a system file used by Windows) and add it to that.
The HOSTS file is located at:
c:\windows\system32\drivers\etc\HOSTS
You will need to open the file with Administrator privileges. To do this, I’d recommend finding Notepad in your Start menu (Start > Windows Accessories > Notepad), right-click on it, then select ‘Open as Administrator’. Your Notepad window will now have Administrator privileges, so when you open the HOSTS file from the File > Open menu, you will be able to save the file again.
Tip: If you’ve browsed to the directory but can’t see the HOSTS file, change the filetype dropdown to ‘All Files’.
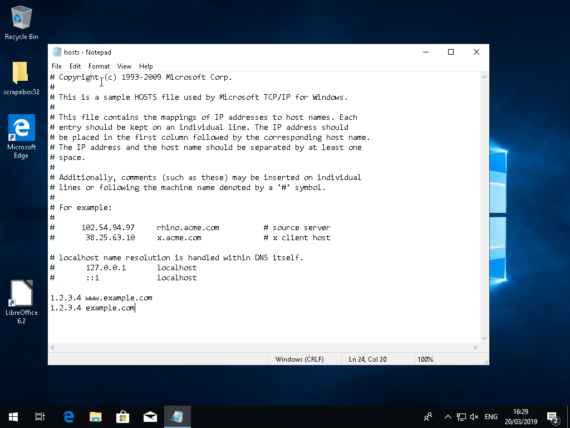
When you’ve successfully opened the HOSTS file, add two new rows in the following format:
1.2.3.4 www.example.com

1.2.3.4 example.com
Your window should look like the screenshot below. Repeat the process for any other websites you’d like to access.
Save the file and see if you can visit the website in your web browser. If not, try closing and re-opening the browser window first.
Use a web browser proxy
Sky have blocked many browser proxies, but new ones are being created all the time, so you shouldn’t have too much trouble finding ones that work. BEWARE: Do not log into anything sensitive using a public browser proxy. Everything you do can be logged and hijacked. They are considered high risk. This is my least recommended option.
To find public web browser proxies, try searching on Google for “web browser anonymous proxy” or similar.